Helloooo everyone !
Come come come ~
I'm going to continue to edit my last post's production again..
=X

- insert image -
File > Open > XR 0001
Then, i used Rectangular Marquee Tool to select whole image.
Ctrl C (for copy purpose) the selected area.

Open back the E-wallpaper tab.
Ctrl V (for paste purpose) the selected area.
After that, I resized & rotate it.
Edit > Transform > Scale
Edit > Transform > Rotate

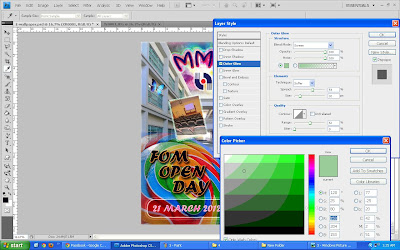
Next, I double click the XR0001 layer, the Layer Style box will pop out.
I ticked the Outer Glow box and make some adjustment.
Opacity : 100%
Noise : 100%
* change the Gradient colour
Spread : 59%
Size : 32px
Range : 52%
Besides that, I also ticked the Inner Glow box to make the image more attractive.

Furthermore, I ticked the Stroke box and clicked OK.


Moreover, I ticked the Stroke box and adjusted the Structure Size to 3px then clicked OK.

Yet, insert another image again.
File > Open > FOM Management


That's all for the image editing~
Now we proceed to the last 2steps, which are editing the Sweet layer and the background effect.
(i) Sweet layer
- double clicked the Sweet layer
- the Layer Style box will pop out
- General Blending > Opacity > 78%
- clicked OK

** The reason i change the Opacity from 100% to 78% is because I want to make the Sweet to be more transparency so our eye attension can more focus on both MMU and FOM Open Days' words.
(ii) Background layer
- Filter > Sketch > Water Paper


Then, i used Rectangular Marquee Tool to select whole image.
Ctrl C (for copy purpose) the selected area.

Open back the E-wallpaper tab.
Ctrl V (for paste purpose) the selected area.
After that, I resized & rotate it.
Edit > Transform > Scale
Edit > Transform > Rotate

Next, I double click the XR0001 layer, the Layer Style box will pop out.
I ticked the Outer Glow box and make some adjustment.
Opacity : 100%
Noise : 100%
* change the Gradient colour
Spread : 59%
Size : 32px
Range : 52%

Besides that, I also ticked the Inner Glow box to make the image more attractive.

Furthermore, I ticked the Stroke box and clicked OK.

Again, I repeated the steps.
File > Open > FOM Cafe
Then, i used Rectangular Marquee Tool to select whole image.
Ctrl C (for copy purpose) the selected area.

Open back the E-wallpaper tab.
Ctrl V (for paste purpose) the selected area.
After that, I resized & rotate it.
Edit > Transform > Scale
Edit > Transform > Rotate
Then, I double click the FOM Cafe layer, the Layer Style box will pop out.
I ticked the Drop Shadow box as well as the Outer Glow box .

- adjustment -
Blend Mode : Pin Light
Opacity : 100%
Noise : 100%
* change the Gradient colour
Spread : 8%
Size : 38px
Range : 52%
Contour : Ring
Moreover, I ticked the Stroke box and adjusted the Structure Size to 3px then clicked OK.

Yet, insert another image again.
File > Open > FOM Management
Then, i used Rectangular Marquee Tool to select whole image.
Ctrl C (for copy purpose) the selected area.

Open back the E-wallpaper tab.
Ctrl V (for paste purpose) the selected area.
After that, I resized & rotate it.
Edit > Transform > Scale
Edit > Transform > Rotate

Then, I double click the FOM Management layer, the Layer Style box will pop out.
I ticked the Outer Glow box and make some adjustment.
Opacity : 100%
Noise : 100%
* change the Gradient colour
Spread : 41%
Size : 40px

I also ticked the Inner Glow box and adjusted the Elements Size to 90px..

Lastly, I ticked the Stroke box and adjust the Structure Size to 3px then clicked OK.

Again, do the same steps,
File > Open > CR
Then, i used Rectangular Marquee Tool to select whole image.
Ctrl C (for copy purpose) the selected area.

Open back the E-wallpaper tab.
Ctrl V (for paste purpose) the selected area.
After that, I resized & rotate it.
Edit > Transform > Scale
Edit > Transform > Rotate
Then, I double click the CR layer, the Layer Style box will pop out.
I ticked the Outer Glow box and make some adjustment.
Blend Mode : Darken
Opacity : 100%
Noise : 100%
* change the Gradient colour
Spread : 49%
Size : 38px

I also ticked the Inner Glow box and adjusted the Elements Size to 125px..

Last but not least, I ticked the Stroke box and adjusted the Structure Size to 7px then clicked OK.

That's all for the image editing~
Now we proceed to the last 2steps, which are editing the Sweet layer and the background effect.
(i) Sweet layer
- double clicked the Sweet layer
- the Layer Style box will pop out
- General Blending > Opacity > 78%
- clicked OK

** The reason i change the Opacity from 100% to 78% is because I want to make the Sweet to be more transparency so our eye attension can more focus on both MMU and FOM Open Days' words.
(ii) Background layer
- Filter > Sketch > Water Paper

* change the element size
- Fiber Length : 15
- Brightness : 60
- Contrast : 74
- clicked OK

Da Da Da Dang !!!
Finally, the final psd E-wallpaper is ready ~

=)
Regards,
KahYee ♥
No comments:
Post a Comment